Slow Network Browsing in
My Network Places
There’s a serious problem in XP network browsing that makes
My Network Places take an unbearably long time to open. Several
solutions have been posted on web sites and in news groups. Some
of them seem to work for some people some of the time, but I’ve
haven’t seen one that solves the problem for everyone all of the
time.
Until Microsoft supplies a fix for this problem, here are
some ways to work around it, by browsing the network using tools
other than My Network Places.
Solution 1: Use
Windows Explorer.
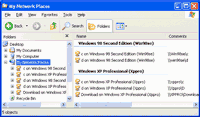 Click
Start | All Programs | Accessories |
Windows Explorer. My Network Places appears in the left
pane. Double click it to browse the network. The results appear
in the right pane.
Click
Start | All Programs | Accessories |
Windows Explorer. My Network Places appears in the left
pane. Double click it to browse the network. The results appear
in the right pane.
Solution 2: Use the hidden NetHood
Folder.
Windows XP keeps a copy of the contents of My Network Places
in a hidden folder called NetHood. Create a shortcut to
NetHood on the Windows desktop:
- Right click the desktop and click New
followed by Shortcut. Type the path to the NetHood
folder in the location box. The path has the form:
d:user name\NetHood
where d is the disk on which Windows XP is installed,
and user name is the name that you use to log on.
Substitute the appropriate values for your computer. For
example, the path on my Windows XP computer is:
/p>
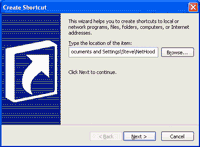
- Click Next and then click Finish to create
the shortcut.
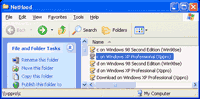
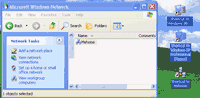
- Double click NetHood and access the shared network
resources from there. Here, I’m about to open the shared C
disk on my Windows XP Professional computer.
Solution 3: Create your own version of My
Network Places, containing your own shortcuts to network
resources.
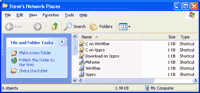
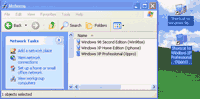 Double
click My Network Places. Read a good book or two while
you wait for it to open. When it finally opens, click View
workgroup computers, then drag and drop each of the other
computers to a spot on the Windows desktop. XP will create a
shortcut to each of them. Here’s what it looks like on my
Windows XP Home Edition computer when I create shortcuts to two
other computers:
Double
click My Network Places. Read a good book or two while
you wait for it to open. When it finally opens, click View
workgroup computers, then drag and drop each of the other
computers to a spot on the Windows desktop. XP will create a
shortcut to each of them. Here’s what it looks like on my
Windows XP Home Edition computer when I create shortcuts to two
other computers:
 If
desired, press Backspace to see the workgroup
name, then drag and drop it to the desktop to create a workgroup
shortcut:
If
desired, press Backspace to see the workgroup
name, then drag and drop it to the desktop to create a workgroup
shortcut:
Here’s a more elaborate example. I’ve created a folder named
Steve’s Network Places, containing shortcuts to:
- The shared C disks on the other two computers.
- A shared folder on one of them.
- The workgroup.
- The other two computers.
 Solution
4: Connect directly to a computer or a shared disk or folder.
Solution
4: Connect directly to a computer or a shared disk or folder.
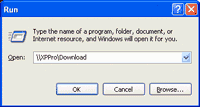
Click Start | Run, type one of these
commands in the box, and click OK:
\\computer
\\computer\share
The first one opens a networked computer and shows its shared
resources. The second one opens a shared disk or folder on a
networked computer. For example, if a computer named XPPro
has a shared folder named Download, the commands would
be:
\\XPPro
\\XPPro\Download
 Solution
5: Map a Network Drive
Solution
5: Map a Network Drive
To access a particular shared drive or folder on another
computer, map it as a network drive:
- In My Computer, click Tools | Map Network
Drive.
- Change the drive letter if desired.
- Specify the shared drive or folder in one of these ways:
a) Enter the path in the Folder box, in the form
\\computer\share
b) Click Browse and browse to the shared
disk or folder
- Click Finish.
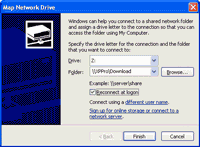 You
can now access the shared drive or folder using its mapped drive
letter, in the same way that you access local disk drives. If
you click Reconnect at logon, the mapping will happen
automatically every time Windows starts.
You
can now access the shared drive or folder using its mapped drive
letter, in the same way that you access local disk drives. If
you click Reconnect at logon, the mapping will happen
automatically every time Windows starts.