|
- Integrated Packages
- Gigabyte Networks
- Trouble Shooting
- Wireless Technology
- On a Budget
- Dot Net Business |
Troubleshooting File and Printer
Sharing - Detailed Steps
Before you go any further in learning
how to troubleshoot File and Printer Sharing on a Windows
network, be sure that you’ve done the preliminary
troubleshooting steps and the TCP/IP troubleshooting steps and
confirmed that the computers can communicate using TCP/IP.
Use the Same Workgroup Name on All Computers
This isn’t strictly necessary, since
Windows networking supports multiple workgroups on a network,
but it makes troubleshooting and browsing the network easier.
By default, Windows XP uses the workgroup name MSHOME. You can
use a different name if you want. For best results on all
versions of Windows, use 1-8 characters (upper case letters,
numbers), with no blanks.
To specify the workgroup name in Windows XP, right click My
Computer and go to Properties | Computer Name | Change. In
Windows 95/98/Me, go to Control Panel | Network |
Identification.
Check the Network Components
These network components must be
enabled on each computer:
-
File and Printer Sharing for
Microsoft Networks (FPS) - makes a computer’s resources
available to other computers on the network.
-
Client for Microsoft Networks (CMN)
- lets a computer access resources belonging to other
computers on the network.
 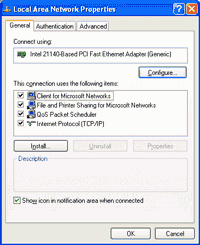 In
Windows XP, open the Network Connections folder, right click
your local area network connection, click Properties, put check
marks in the boxes for FPS and CMN, and click OK to close the
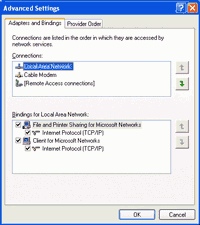
window. Then, click Advanced | Advanced Settings, click your
local area network connection under Connections, look under
Bindings, and make sure that the Internet Protocol (TCP/IP) box
has a check mark for FPS and CMN. If any other protocols appear
in the list of bindings, you must un-check the boxes for those
protocols. Using more than one protocol on even one computer
makes Windows networking unreliable. In
Windows XP, open the Network Connections folder, right click
your local area network connection, click Properties, put check
marks in the boxes for FPS and CMN, and click OK to close the
window. Then, click Advanced | Advanced Settings, click your
local area network connection under Connections, look under
Bindings, and make sure that the Internet Protocol (TCP/IP) box
has a check mark for FPS and CMN. If any other protocols appear
in the list of bindings, you must un-check the boxes for those
protocols. Using more than one protocol on even one computer
makes Windows networking unreliable.
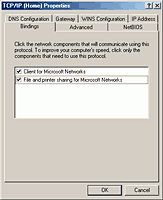 In
Windows 95/98/Me, go to Control Panel | Network, double click
the TCP/IP->Adapter entry for your local area network, and click
Bindings. Put check marks in the boxes for FPS and CMN. If
you’ve installed any other protocols, you must go to the
Bindings tab of their Protocol->Adapter entries and un-check the
same boxes. Using more than one protocol on even one computer
makes Windows networking unreliable. In
Windows 95/98/Me, go to Control Panel | Network, double click
the TCP/IP->Adapter entry for your local area network, and click
Bindings. Put check marks in the boxes for FPS and CMN. If
you’ve installed any other protocols, you must go to the
Bindings tab of their Protocol->Adapter entries and un-check the
same boxes. Using more than one protocol on even one computer
makes Windows networking unreliable.
Network Neighborhood and My Network Places
In Windows 95 and 98, Network
Neighborhood shows an icon for each computer on the network that
has FPS enabled. Double clicking the icon shows that computer’s
shared resources: disks, folders, and printers. It’s possible
that a computer has FPS enabled but has no shared resources. If
so, the window that opens when you double click the computer
name will be empty.
In Windows Me and XP, My Network Places contains shortcuts to
some or all of the shared disks and folders on the network. You
can add shortcuts by clicking Add a network place, and you can
delete shortcuts by right-clicking them and clicking Delete.
It’s quite possible that a shared resource doesn’t appear in My
Network Places. You might have deleted it, or Windows might not
have noticed it yet. Computer and workgroup names don’t appear
unless you create a shortcut to them.
Sometimes, shortcuts in My Network Places seem to “go bad” for
no apparent reason. When you double click one that was working
previously, you get an ominous looking error message:
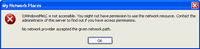
Since you’re the administrator, you ask yourself whether you
have access permissions, and you tell yourself that you do. But
Windows XP doesn’t listen to you, and it won’t let you access
the shared disk or folder.
Delete the bad shortcuts, and let Windows re-create them.
Test Network Access to Computers
and Shares
If access through Network
Neighborhood or My Network Places isn’t working, try connecting
directly to another computer or to one of its shared disks or
folders. Click Start | Run, then type one of these commands in
the box and click OK:
\\computer
\\computer\share
\\IP-address
\\IP-address\share
For example, if a computer named XPPro has IP address
192.168.0.10 and has a shared folder named Download, the
commands would be:
\\XPPro
\\XPPro\Downoad
\\192.168.0.1
\\192.168.0.1\Download
If access by computer name fails, but access by IP address
works, there’s a problem with NetBIOS name resolution using
NetBIOS Over TCP/IP.
click here to go back |